


Installation Step 5: Prepare the Collar Receiver
Your Collar Receiver comes with short Contact Points installed. If your dog has a long or thick coat, you have two options to ensure consistent contact: either trim the hair around the Contact Points or switch to the longer Contact Points included with your system (follow 1-5 in diagram 5A). Tighten the Contact Points with pliers one-half turn beyond finger tight. Check the tightness weekly.
To Insert and Remove the Battery
Note: Do not install the battery while the Collar Receiver is on your dog.
- Remove the screws with a Philips screwdriver (5B).
- Remove the Battery Lid (5B).
- Install a 9-volt alkaline battery (5C).
- Replace the Battery Lid (5C). Ensure O-ring stays in place.
- Reinstall the screws. Do not over-tighten the screws.
- Replacement 9-volt alkaline batteries can be purchased online or found at many retailers.

To Set the Stimulation Level
Read all steps before attempting to set the Stimulation Level.
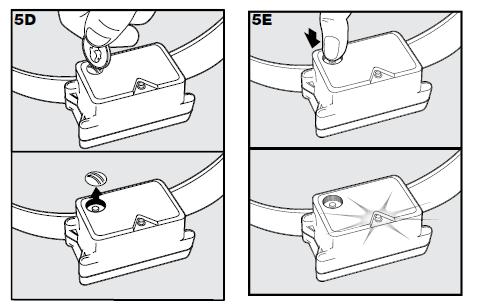
- Remove the clear plastic cover with a coin to expose the Stimulation Level Button (5D).
- With the battery installed, press the Stimulation Level Button and release when the Receiver Indicator Light lights up (5E).
- The Receiver Indicator Light will emit a series of flashes representing the Stimulation Level. For example, 2 flashes = Stimulation Level 2.
- Increase the Stimulation Level by pressing and releasing the Stimulation Level Button within 5 seconds of the previous series of flashes.
- After setting the Stimulation Level, replace the cover to protect the Stimulation Level Button.
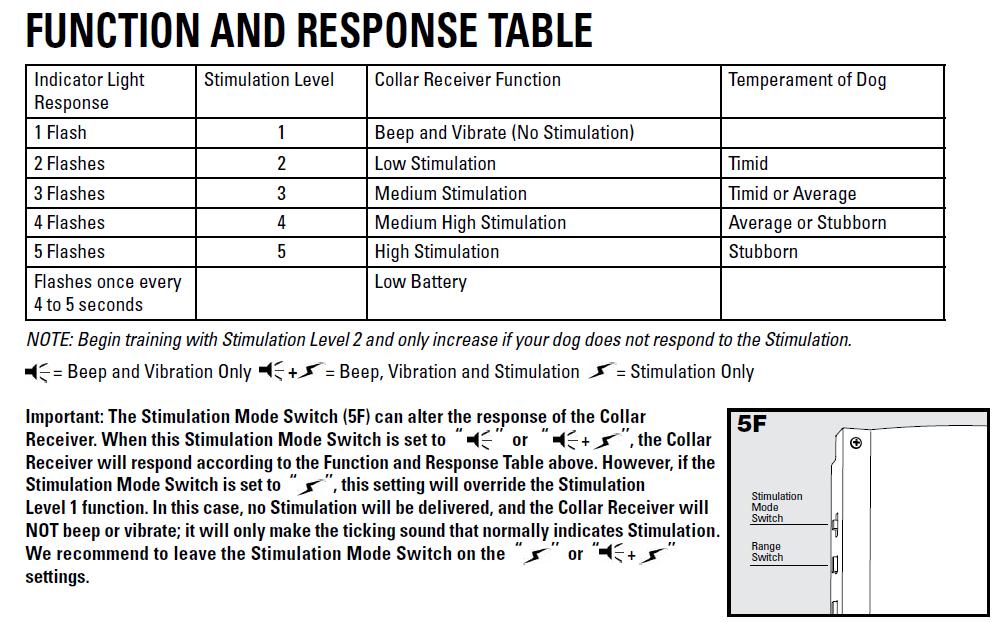
The Stimulation Levels increase in strength from 1 to 5. Pushing the Stimulation Level Button while the Collar Receiver is on level 5 will cause the Collar Receiver to go back to level 1. Refer to the Function and Response Table, on the following page, to choose the Stimulation Level that best fits your dog.
The Collar Receiver is equipped to automatically increase the level of Stimulation the longer your dog remains in the
Stimulation Zone if the collar is set at level 2 or above. The Receiver Indicator Light acts as a low battery indicator, flashing every 4 to 5 seconds when a replacement is required.