


Setup Step 2: Prepare the Collar Receiver
Charge the Collar Receiver
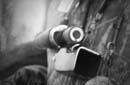
- Lift the rubber cover protecting the Charging Jack.
- Connect the charger connector to the Charging Jack.
- Plug the charger into a standard wall socket.
- Charge the Collar Receiver for 24 hours for the first charge. Recharges take only 12 hours.
- Note: The Receiver Indicator Light will flash after 12 hours of charging. For the first charge, continue to charge the Collar Receiver for an additional 12 hours.
- When charging is complete, replace the rubber cover.
If the Collar Receiver is used in or around salt water, the Collar Receiver should be rinsed with fresh water following each use. Prior to rinsing, the rubber charging jack cover should be removed from the power plug socket and left out until the Collar Receiver has air dried. To extend the life of your battery, turn the Collar Receiver off when it is not in use.
To Turn the Collar Receiver On:
- Press and hold the On/Off Button until the Receiver Indicator Light comes on and the Collar Receiver beeps 5 times.
- Release the On/Off Button. The Receiver Indicator Light will flash until the Collar Receiver is turned off. The flashing light indicates the Collar Receiver is ready to receive a radio signal from the Remote Transmitter.
To Turn the Collar Receiver Off:
- Press and hold the On/Off Button until the Receiver Indicator Light comes on and the Collar Receiver beeps 2 times.
- Release the On/Off Button.
